Nailed It: A Step-by-Step Guide to Trimming Dog's Nails
Trimming with Confidence: How to Safely Groom Your Dog's Nails
Regular nail maintenance is a crucial part of keeping your dog healthy and comfortable. While many pet owners rely on professional groomers or veterinarians for this task, learning to trim your dog's nails at home can be a valuable skill.
Experience the convenience of professional nail clipping for your furry friend at WAG the Dog
ensuring their comfort, health, and well-being, all in one place.
Step 1: Gather Your Supplies:
Before you begin, gather the necessary supplies: a dog nail clipper, treats, and Bleed Stop powder. It's crucial to have the right tools to ensure a safe and efficient process. WAG can provide Bleed Stop along with all the necessary tools required for clipping.
Different Clipper Types:
Guillotine Clippers:
Design: These clippers have a small hole where you insert the nail, and a blade slices through the nail when you squeeze the handles.
Best For: Guillotine clippers work well for small to medium-sized dogs with thin or average nail thickness. They are precise and easy to use.
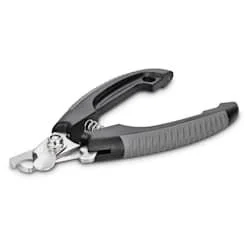
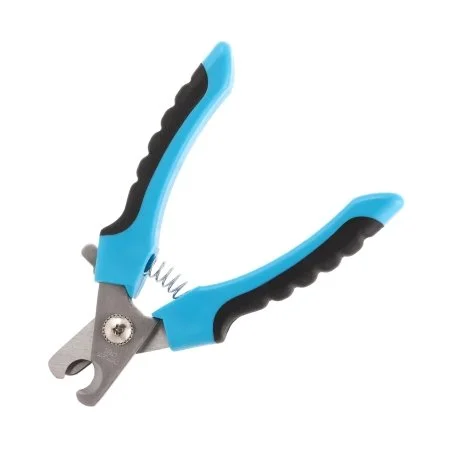
Scissor Clippers: (large & small)
Design: These clippers resemble scissors with two blades that come together when you squeeze the handles. They can be found in both large and small sizes.
Best For: Large scissor clippers are suitable for big dogs with thick nails, while small scissor clippers are ideal for small dogs or dogs with finer nails.
Nail Sanders (Rotary Sanders):
Design: Nail sanders use a rotary tool to grind down the nail gradually. They come with a sanding drum that spins at high speeds.
Best For: Nail sanders are versatile and can be used on dogs of various sizes. They are ideal for dogs with thick nails that are difficult to trim with traditional clippers.

Dremel Grinder:
Design: The Dremel is a brand of rotary tool often used for grinding dog nails. It works similarly to a nail sander, but Dremels are well-known for their precision and adjustable speed settings.
Best For: Dremel grinders are suitable for dogs of all sizes and are especially useful for those with very thick or tough nails.

Choosing the right type of nail clipper depends on your dog's size, nail thickness, and your comfort level with the tool. Each type has its advantages, and the choice often comes down to personal preference and your dog's specific needs. Always make sure to use the appropriate size and type of clipper for your dog to ensure safe and efficient nail trimming.
Step 2: Prepare Your Dog - Creating a Calm and Comfortable Environment
Before you start trimming your dog's nails, it's essential to create a relaxed atmosphere and ensure your furry friend is comfortable. Dogs can be sensitive about their paws and nails, so taking some time to prepare them mentally and physically will make the process smoother. Here's how to do it:
Choose a Quiet and Familiar Location:
Find a quiet, well-lit area in your home where you and your dog feel comfortable. A familiar location will help your dog relax since they're already acquainted with it.
Gather Your Supplies:
Calm Greetings:
Approach your dog calmly and avoid any sudden movements that might startle them. Speak to your dog in a soothing, reassuring tone to let them know everything is okay.
Petting and Positive Reinforcement:
Begin by petting your dog gently to help them relax. Many dogs find this soothing and comforting. You can also offer some treats or their favorite toy to create positive associations with the nail trimming process.
Acclimatization:
If your dog is not used to having their paws touched, spend a few days before nail trimming sessions getting them used to it. Gently touch and massage their paws without attempting to trim the nails. Reward them with treats and praise during these sessions.


Handling Their Paws:
Before you start, gently hold each of your dog's paws and apply a slight pressure to extend the claws. Release the paw immediately if your dog seems uncomfortable or anxious. Gradually, over multiple sessions, your dog should become more accustomed to this handling.
Stay Calm and Patient:
Dogs can pick up on their owner's emotions, so try to stay calm and patient throughout the process. If you're anxious or agitated, your dog is more likely to be the same.
Take Breaks:
Be prepared to take breaks during the nail trimming session if your dog becomes too stressed. It's essential not to force the process and keep it positive.
Creating a calm and comfortable environment and getting your dog used to the process gradually will make nail trimming a less stressful experience for both you and your furry companion. Remember, it may take some time for your dog to fully accept nail trimming, so be patient and persistent in your efforts.
Step 3: Understanding the Anatomy
Understanding the different parts of your dog's nail is crucial when it comes to safe and effective nail trimming. The two main components are the hard outer shell and the quick. Let's break down each part and provide some visual representation.
Hard Outer Shell:
The hard outer shell, often referred to as the nail sheath, is the visible part of your dog's nail. It's the part that you see and feel when looking at your dog's paws. This shell is made up of tough, keratinized tissue and is similar to your own fingernails. The hard outer shell serves to protect the sensitive quick and provides structure and support to the nail.
The Quick:
The quick is the sensitive, inner part of the nail, and it contains blood vessels and nerve endings. It's a pinkish area that starts at the base of the nail and runs down its length. The quick provides nourishment to the nail and contributes to its growth. It's essential to avoid cutting or grinding into the quick, as this can be painful and lead to bleeding.
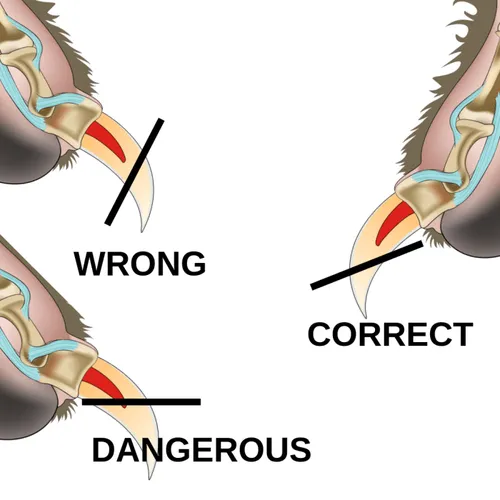
The Quick
When trimming your dog's nails, you must be careful not to cut into the quick. The quick varies in size and color depending on the dog's breed, size, and individual factors. In some dogs with light-colored nails, the quick is more visible, while in dogs with dark-colored nails, it can be more challenging to see. Always make sure you have a good view of the quick before attempting to trim.

Here's a general rule to follow:
Trim the nail gradually, taking off small bits at a time.
Look for a pale or translucent area in the nail when viewed from the side. This area is less likely to contain the quick.
If you accidentally cut into the quick and it starts to bleed, have WAG Bleed Stop powder on hand to stop the bleeding. Apply gentle pressure to the nail using the styptic product.
Understanding the nail's anatomy and being cautious when trimming will help ensure a safe and comfortable nail grooming experience for your dog. Always have proper lighting and take your time to avoid cutting into the quick. If you're unsure or uncomfortable with the process, contact WAG the Dog Grooming for guidance and demonstration.
Step 4: Trimming Technique:
Holding the Nail Clipper and Your Dog's Paw:
Choose the Right Clipper:
Start by selecting the appropriate type of nail clipper.
Hold it in your dominant hand.Prepare Your Dog:
Ensure your dog is comfortable and calm.
You can place your dog on a non-slip surface like a rubber mat to prevent them from sliding.Gently Secure the Paw:
With your non-dominant hand, gently but firmly hold your dog's paw.
Be cautious not to squeeze too tightly, as it may cause discomfort.
Your grip should provide stability but not cause your dog distress.Examine the Nail:
Carefully examine the nail to identify the quick (the sensitive inner part).
The quick appears as a pinkish area inside the nail.
Avoid cutting into the quick to prevent pain and bleeding.Holding the Clipper:
Position the nail clipper perpendicular to the nail.
Ensure the cutting blades are facing you and the curved part of the clipper is facing the nail.
Cutting the Nail:
Start with the Tips:
If you're new to nail trimming, begin by cutting just the tips of the nails.
Gradually increase the length you trim as you become more confident.Place the Clipper:
Gently position the clipper around the nail.
Make sure you're below the quick, closer to the tip.
Avoid the pinkish area.Squeeze Slowly:
Apply gentle pressure on the clipper to make a precise cut.
Go slowly and be cautious.
If you're unsure about the location of the quick, make small cuts rather than trying to cut the entire nail at once.Monitor for Signs of Discomfort:
Pay attention to your dog's reaction.
If they appear uncomfortable or the nail starts to bleed, stop immediately.
Apply Bleed Stop powder to stop the bleeding and consult your veterinarian.Smooth the Edges:
After trimming, you can use a nail file or a grinder to smooth the edges of the nail.
This helps prevent any sharp edges from snagging on surfaces.Reward Your Dog:
Praise and reward your dog for their cooperation.
This positive reinforcement will make future nail trims easier.Repeat for Each Nail:
Carefully follow this process for each nail, checking the quick's location each time.
Remember, the key is to proceed slowly and attentively, especially if you're new to nail trimming. Gradually, both you and your dog will become more comfortable with this routine.
If you have any concerns or uncertainties, consult with WAG the Dog your professional groomer for guidance.

Step 5: Monitoring Progress:
Recognizing when you're getting close to the quick during nail trimming is crucial to avoid cutting it, as it can be painful for your dog and cause bleeding. Here's how to recognize the proximity to the quick and some tips for monitoring the progress:
Recognizing Proximity to the Quick:
Change in Nail Color:
The first indicator that you're nearing the quick is a noticeable change in the color of the nail. In most dogs, the outer part of the nail is hard and translucent, while the quick is a pinkish area inside. When you see the pinkish color become visible, it's a sign that you're close to the quick.Texture Change:
The texture of the nail may change as you approach the quick. The outer shell is hard and smooth, but the quick can feel softer and slightly mushy.Lack of Translucency:
The translucent quality of the outer nail may begin to fade as you approach the quick. This is another visual cue to watch for.
Tips for Monitoring the Progress:
Use Adequate Lighting:
Ensure you have good lighting when trimming your dog's nails. Adequate lighting will help you see any color or texture changes more clearly.Take Your Time:
Don't rush the process. Go slowly and make small, controlled cuts. This allows you to closely monitor the nail and reduce the risk of cutting into the quick.Stop and Check Frequently:
After each small cut, pause and examine the cross-section of the nail. Look for the pinkish color, especially on the freshly cut edge. If you see any signs of the quick, stop cutting immediately.Be Cautious with Dark Nails:
Dark-colored nails can be more challenging to trim because it's harder to see the quick. In these cases, make extremely small cuts, and use a flashlight to shine through the nail to check for proximity to the quick.Professional Guidance:
If you're uncertain about how to recognize the quick or need additional assistance, consult with WAG the Dog Mobile Grooming. We can provide guidance and even demonstrate proper nail trimming techniques.
Remember that it's always better to trim too little and need to revisit it later than to cut too much and risk injuring your dog. With practice, you'll become more adept at identifying the quick's proximity and trimming your dog's nails safely.
Step 6: Reward and Repeat:
Positive reinforcement plays a crucial role in making the nail trimming experience positive for your dog. Dogs, like humans, respond well to encouragement and rewards. When they associate nail trimming with positive experiences, they are more likely to cooperate. Here's how to emphasize the importance of positive reinforcement:
Offer Treats and Praise:
Have a supply of your dog's favorite treats on hand. Before, during, and after the nail trimming session, offer treats and praise to reward your dog for their cooperation. Use a calm and cheerful tone when praising them.Step-By-Step Rewards:
Break the nail trimming process into smaller steps, rewarding your dog at each stage. For instance, after successfully handling their paw, offer a treat and praise. This conditions your dog to associate each step with positive outcomes.Consistency: Be consistent with your rewards.
Every time your dog exhibits good behavior during nail trimming, reward them. This consistent positive feedback reinforces their cooperation.Use High-Value Treats:
Choose treats your dog absolutely loves, especially ones they don't get at other times. High-value treats can be extra motivating and create a positive connection with the nail trimming routine.Praise and Petting:
Along with treats, use gentle petting and verbal praise as rewards. Many dogs enjoy being petted on their favorite spots, such as behind the ears or along their back. The combination of treats, praise, and physical affection can be very effective.Short and Successful Sessions:
Keep nail trimming sessions short and successful, especially if your dog is new to the experience. Gradually increase the time as your dog becomes more comfortable. Each successful session reinforces the positive association.Stay Patient:
Be patient and understanding. If your dog seems anxious or uncooperative, stay calm and composed. Avoid raising your voice or displaying frustration, as this can create negative associations.End on a High Note:
Always aim to end the session on a positive note. After the last nail is trimmed, provide extra treats and lavish praise. This creates a strong positive impression, making your dog more receptive to future nail trims.
By consistently using positive reinforcement, you can turn what may be initially a stressful experience into a routine that your dog accepts and, over time, even enjoys. It strengthens the bond between you and your pet while ensuring that nail trimming becomes a stress-free activity.